How to Set Up an Amazon Seller Account in 2023
Are you thinking about starting an Amazon business? Well, the first step is to set up your Amazon seller account. This account gives you the ability to list products for sale, create new products, adjust your pricing, manage your inventory, and much more.
Setting up an Amazon seller account is fairly easy, but there are a number of steps you’ll have to complete. We’ve included everything you need to know about the process here, plus some helpful tips to give you the best chance of creating a successful business.
Table of contents
Keep reading to learn how to successfully register your Amazon seller account.
Why Sign Up with Amazon?
If you’re thinking about selling products online you might be wondering if it’s worth it to create an Amazon seller account. Can’t you just sell your products on your own website?
Well, yes, of course, you can create your own website and sell your products there. But how are you going to market it? People need to find your site before they can buy your products. This means a lot of time and money spent on SEO, advertising, and other marketing initiatives. And even then there’s no guarantee you’ll get a decent amount of traffic.
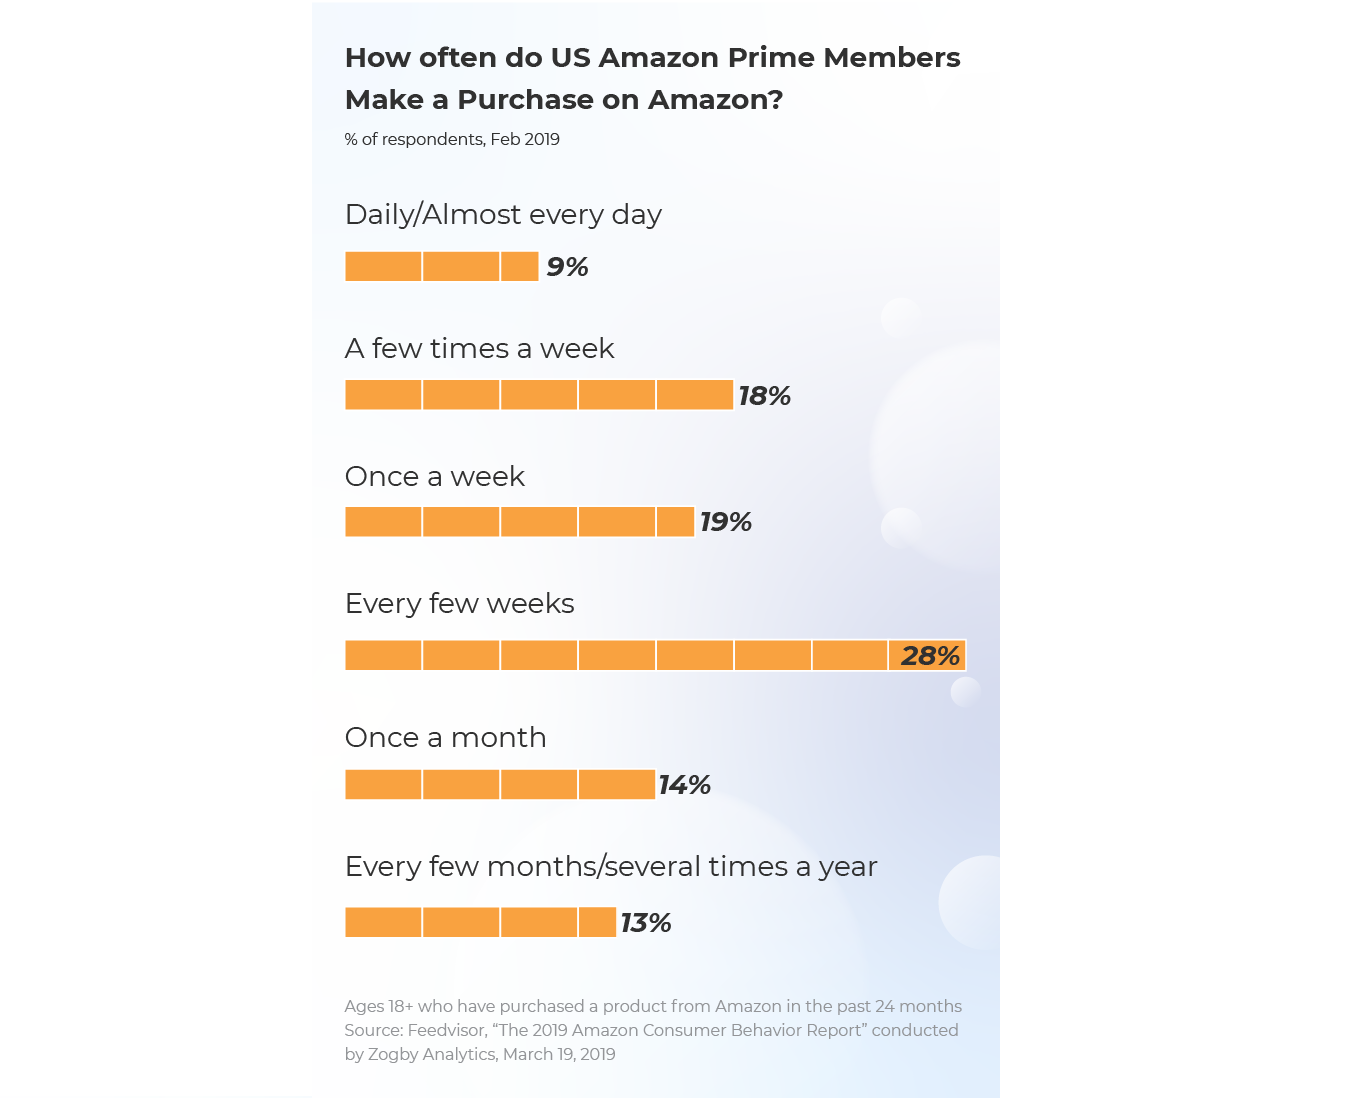
The advantage of selling on Amazon is that you get to list your products on the world’s largest marketplace. They have a built-in customer base with millions of Prime users, so you know people are going to find your products.
Amazon also has an established name, so even though you’re an unknown seller people trust Amazon so much they’ll be willing to buy from you.
If you want to build your business quickly and make money right out of the gate selling on Amazon is the best way to go.
What Can You Do With Your Seller Account?
Creating an Amazon account doesn’t just let you list products on their website. With your account you’ll also be able to:
Use Amazon’s existing listings to sell products that are already in their database.
Create new products to sell on the marketplace.
Create and edit your listings, including adding images and descriptions for your products.
Manage your pricing and make adjustments based on current sales and your competition.
Update your inventory levels.
Review your feedback and respond to reviews.
Send emails to customers.
Manage your customer service.
As you can see, your Amazon seller account gives you all the tools you need to effectively manage your business.
Amazon Account Types
Before you set up your account you’ll need to decide what type of account you want. Amazon gives you two options:
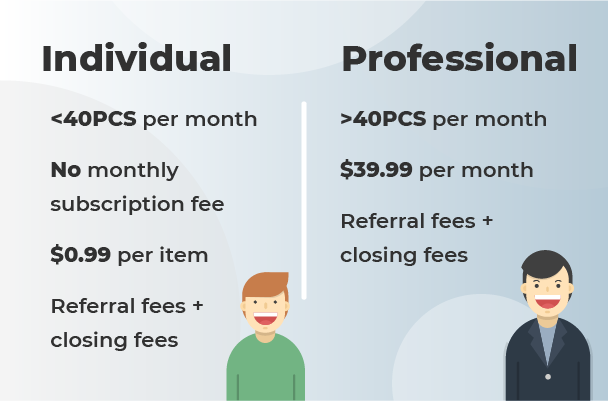
Individual: This account is free to create. However, you’ll be charged $0.99 every time you sell an item. If you only plan on selling a few items every month then this might be your best option. Just know that if you want to scale up your business you’ll likely need to invest in a paid account.
Professional: This type of account costs $39.99 per month, but it comes with a number of benefits. Most importantly, you don’t have to pay the $0.99 for every sale. Simple math shows you that if you sell any more than 40 products a month the Professional account is more cost-effective. In addition, you’ll also be able to:
Use the bulk listing tool
Customize shipping rates for your items
Offer special promotions
Have your products gift-wrapped
Get placed at the top of product detail pages
Which account type you choose is up to you. Generally speaking, if you’re just looking to give Amazon selling a try and only plan to sell a small number of products to start then go with the individual account (you can always upgrade later). But if you’re serious about making as much money as you can from selling on Amazon choose the Professional account.

How to Set Up Your Amazon Seller Account
Once you choose what type of account you want it’s time to go through the sign-up process and actually apply for your account.
Follow the steps below to make sure it’s set up correctly.
1. Have the Right Documents Ready
To start, make sure you have the following on hand:
A valid credit card
A bank statement or credit card statement
A piece of ID
You’ll need these to complete your account registration.
2. Start the Process
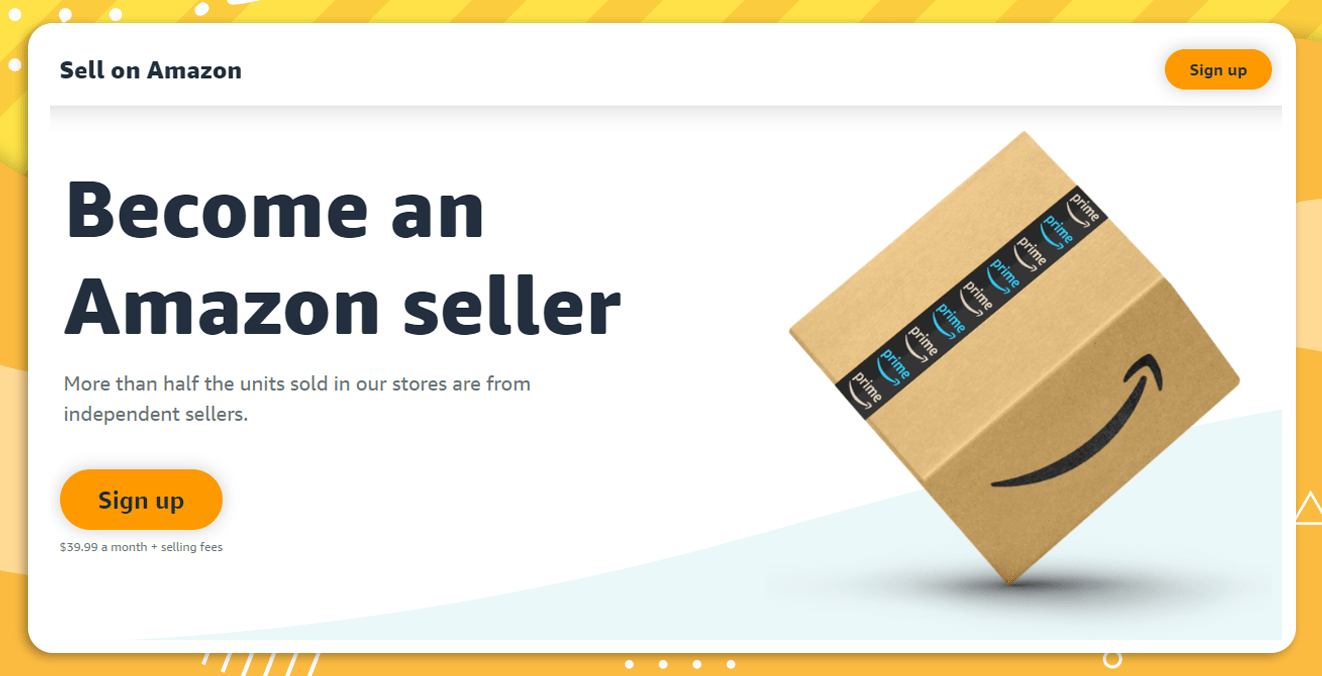
Go to Amazon.com and click Sell at the top of the page. On the next page, click Sign Up to sign up as a professional seller. Or you can scroll down and select Sign up to become an individual seller.
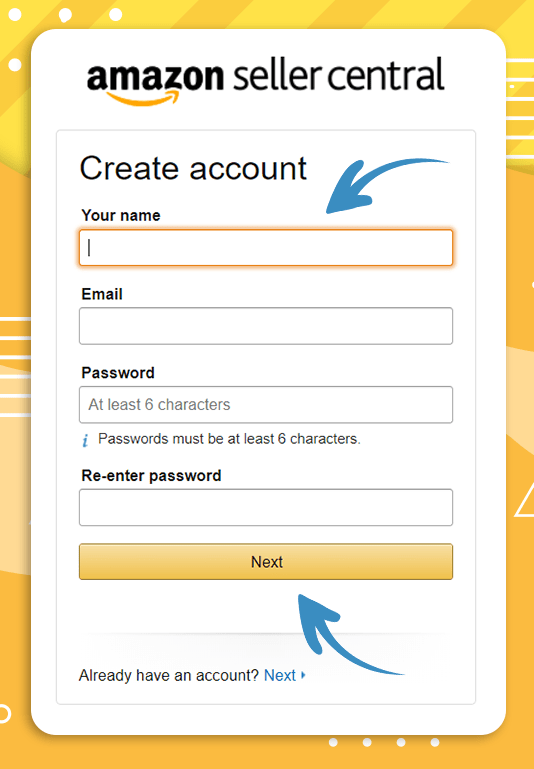
From there, you’ll be asked to enter your name, email, and desired password. Once this information is entered, click Next.
3. Verify Your Email
After you’ve submitted your email Amazon will send you a code. Go to your email, open the message from Amazon, and copy the code. Then, return to the sign-up page and paste the code into the field proved.
Once that’s done, click Verify.
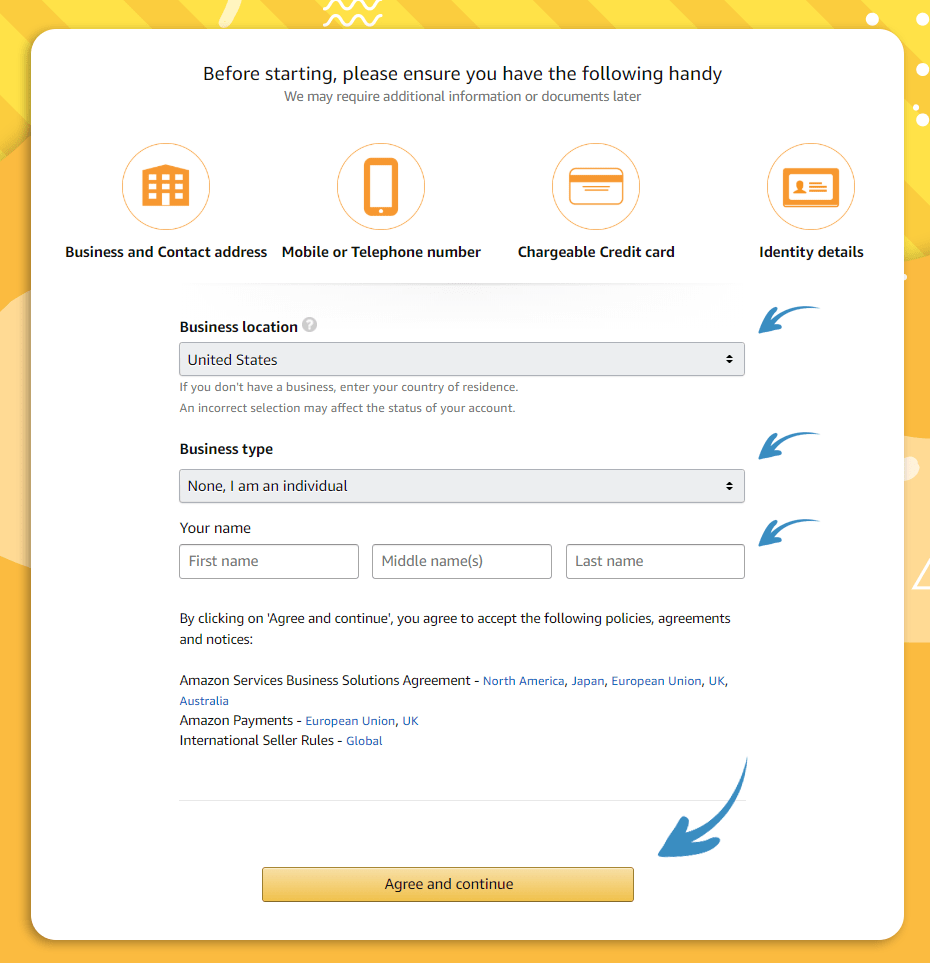
4. Enter Your Business Information
Amazon will then ask you to enter your business location. This is the location where you registered your business. If you don’t have a business just enter your country of residence. Then enter your business type. Select the option that applies to you.
Once this information is submitted enter your full name then click Agree and Continue.
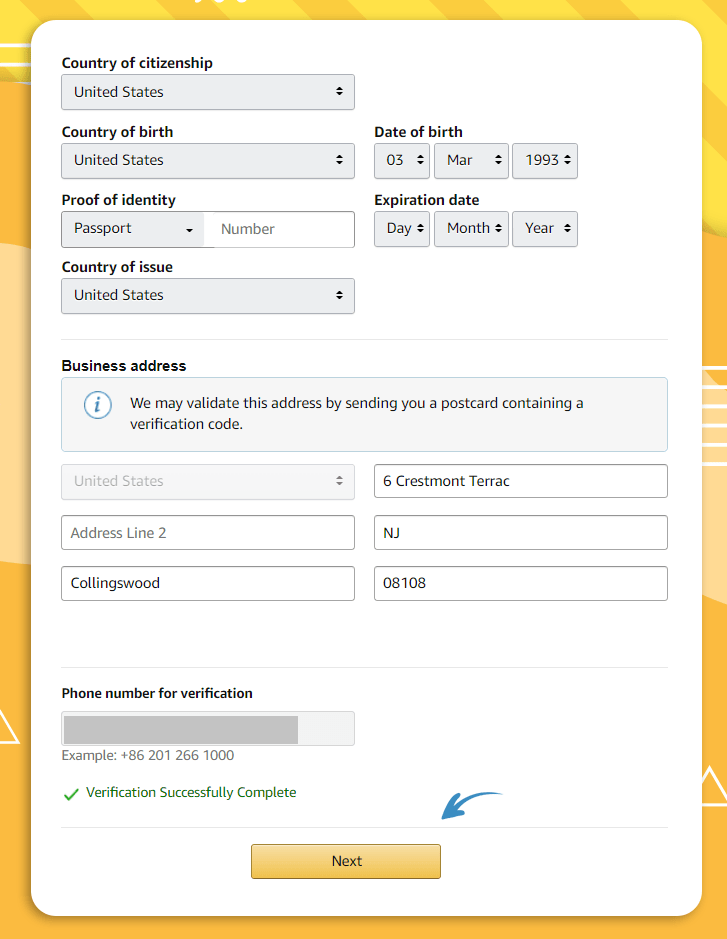
On the following page, you’ll need to enter your country of citizenship and birth and submit one piece of identification. You can choose between your driver's license, passport, or permanent residence card. Then, enter your business address. This is either your home address (if you don’t have your own business) or the address you registered your business under.
Before you move on to the next step you’ll also need to enter your phone number. Make sure to enter a valid number, as Amazon will call or text you to verify it (you can choose the verification method you prefer).
After you’ve entered your information and verified your phone number, click Next.
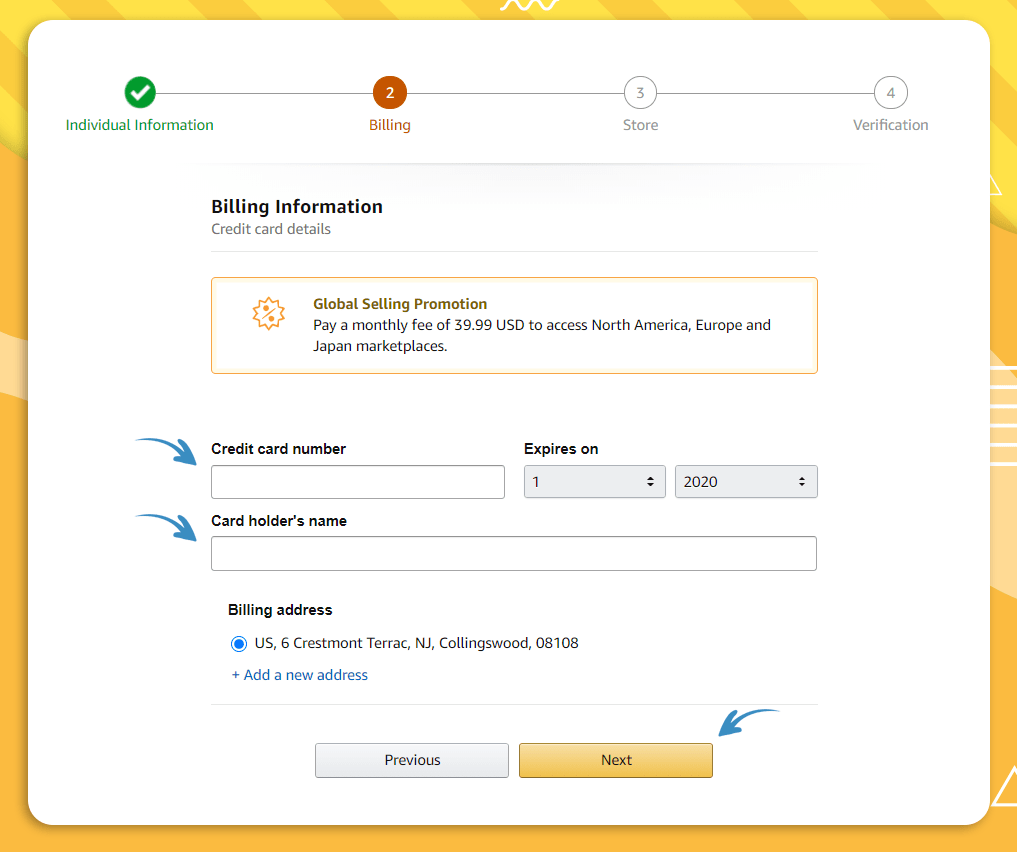
5. Choose Your Billing Method
On this page, you’ll need to enter your credit card information. This will be the credit card Amazon bills for your account fees.
Click “Next” when you’re ready to move on the next step.
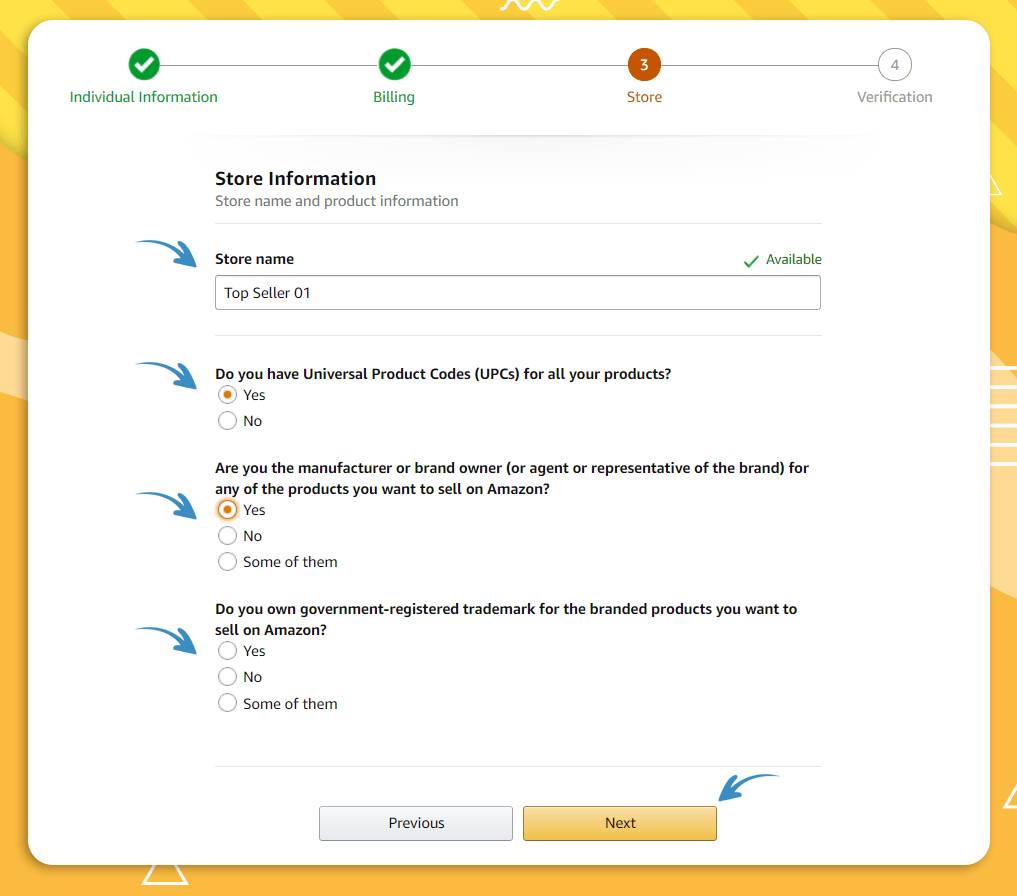
6. Store Information
Choose a name for your store. This is the seller name customers will see on Amazon. Try to come up with something catchy but not too specific. That way you can branch out into multiple different niches.
Next, Amazon will have a few questions about your products you’ll need to answer. Let them know whether you have UPCs for your products, are the manufacturer or brand owner, and if you have any trademarks.
When you’re done with the questions click Next to continue.
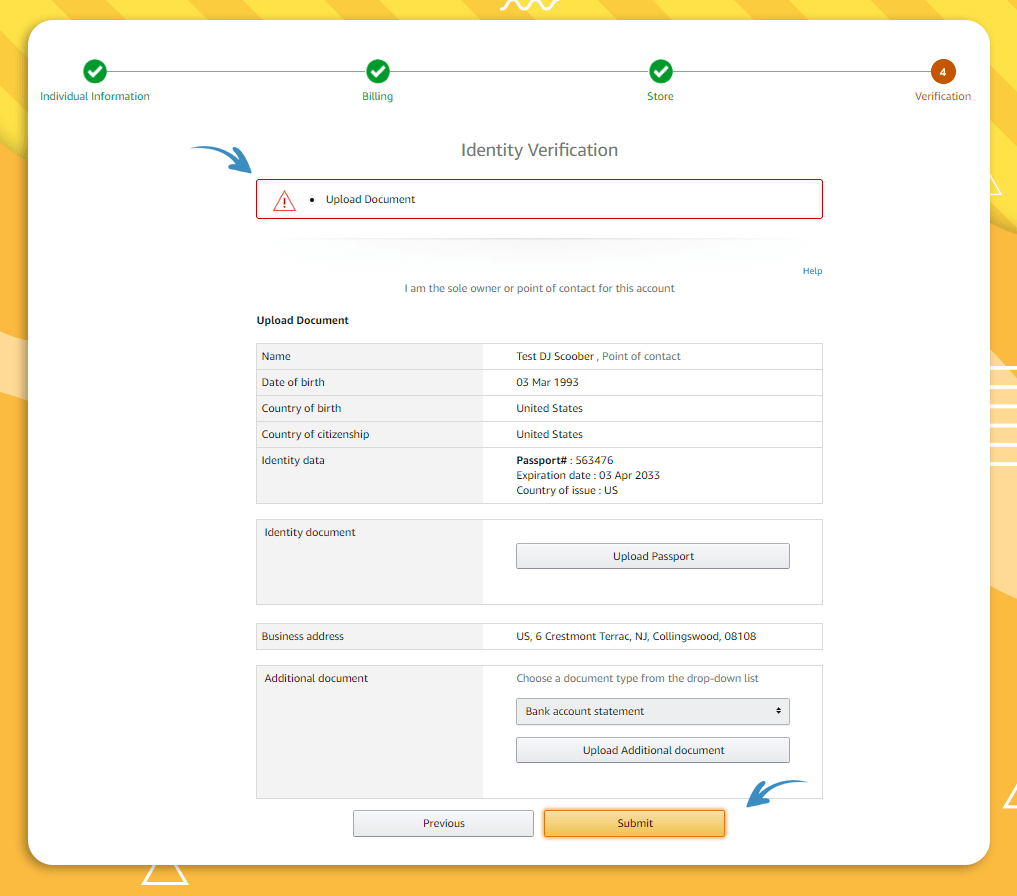
7. Identity Verification
Review your information at the top of the page to ensure it’s correct. Then, upload a photo of your identification. You can either scan it in color or take a photo. You’ll also need to submit an additional document. This can be either a bank account statement or a credit card statement.
Once your documents are uploaded click Submit to submit your application.
8. Your Account is Now Under Review
That’s it! Once you verify your identity your account will now be under review. Amazon will then approve you or If there is an issue with any of the information you entered they’ll reach out to you so you can change it.
Once your account is approved you’ll be able to login to seller central, where you have access to add products and start creating your listings.
How to Start Selling on Amazon
At this point, you’re probably wondering how to make money on Amazon. What are the next steps? Here are our recommendations:
Choose a Sales Model
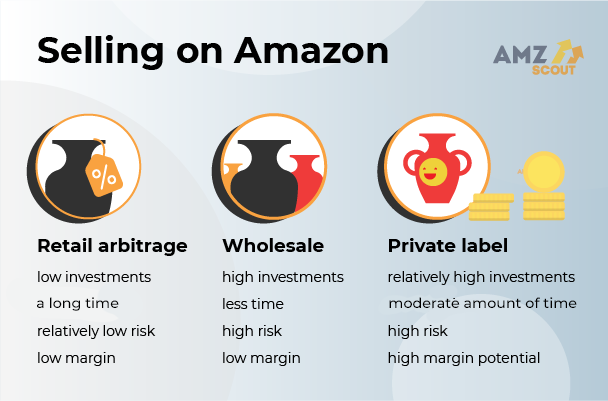
First, you’re going to want to decide what model you’re going to use for your business. Three of the most common options are:
Retail Arbitrage: This involves going to local retail stores and searching for items that are on sale or clearance. If you can find products selling for less than they are on Amazon you might be able to make money reselling them. There are apps available that allow you to scan items to see their price on Amazon.
Wholesalers: For the best per product price you’ll have to buy your products from wholesalers. These companies purchase directly from manufacturers with the goal of selling to retailers. Keep in mind that you’ll usually have to buy in bulk, so while the per-item price is low you’ll need a fairly big budget for this strategy.
Private Label: Have an idea to improve an existing product? Want to create an entirely new product? Then a private label business is for you. Go directly to manufacturers and have them create custom products for you. You can even create your own branding a logo and include this on your items.
Each strategy has its pros and cons, so do your research and choose the one that best suits your business goals.
Find a Product to Sell
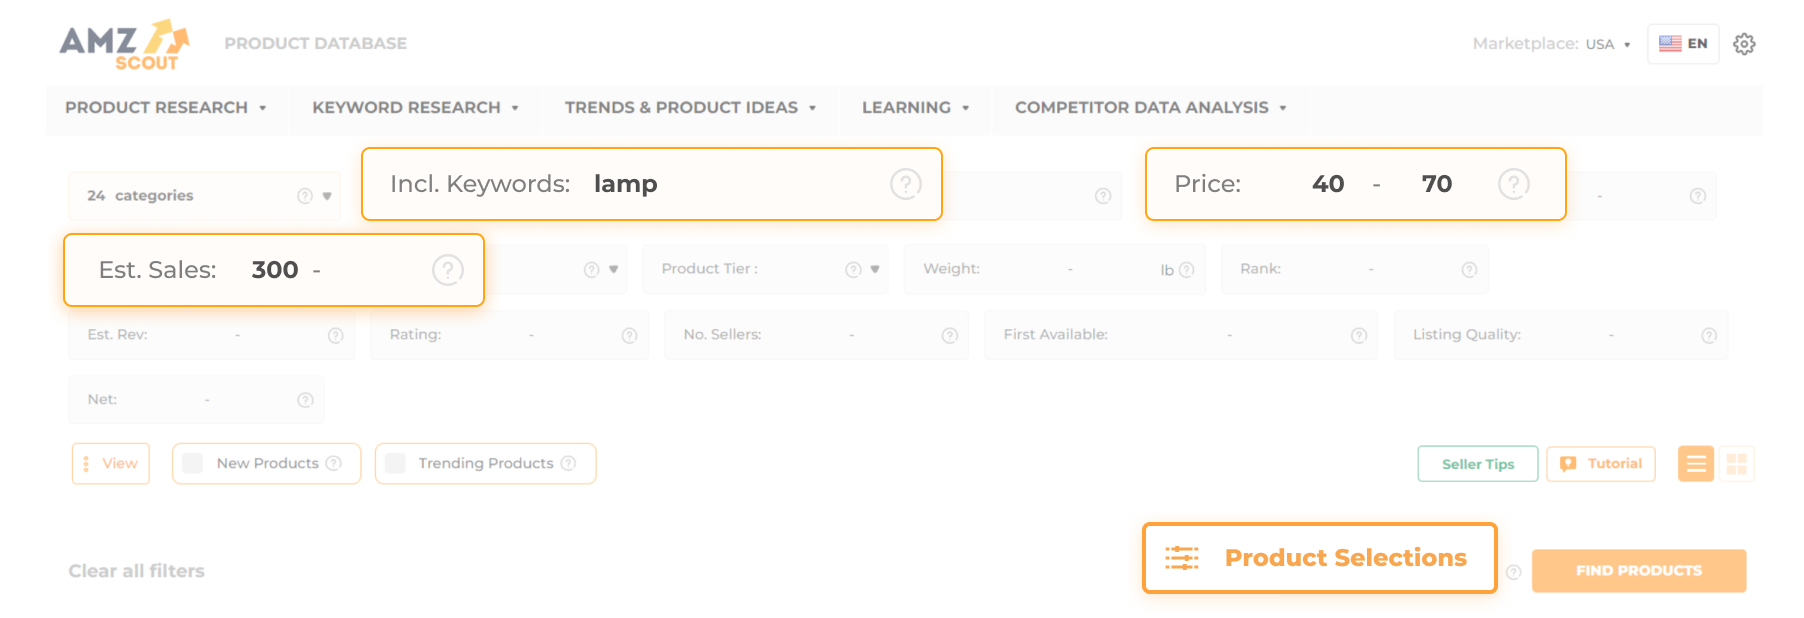
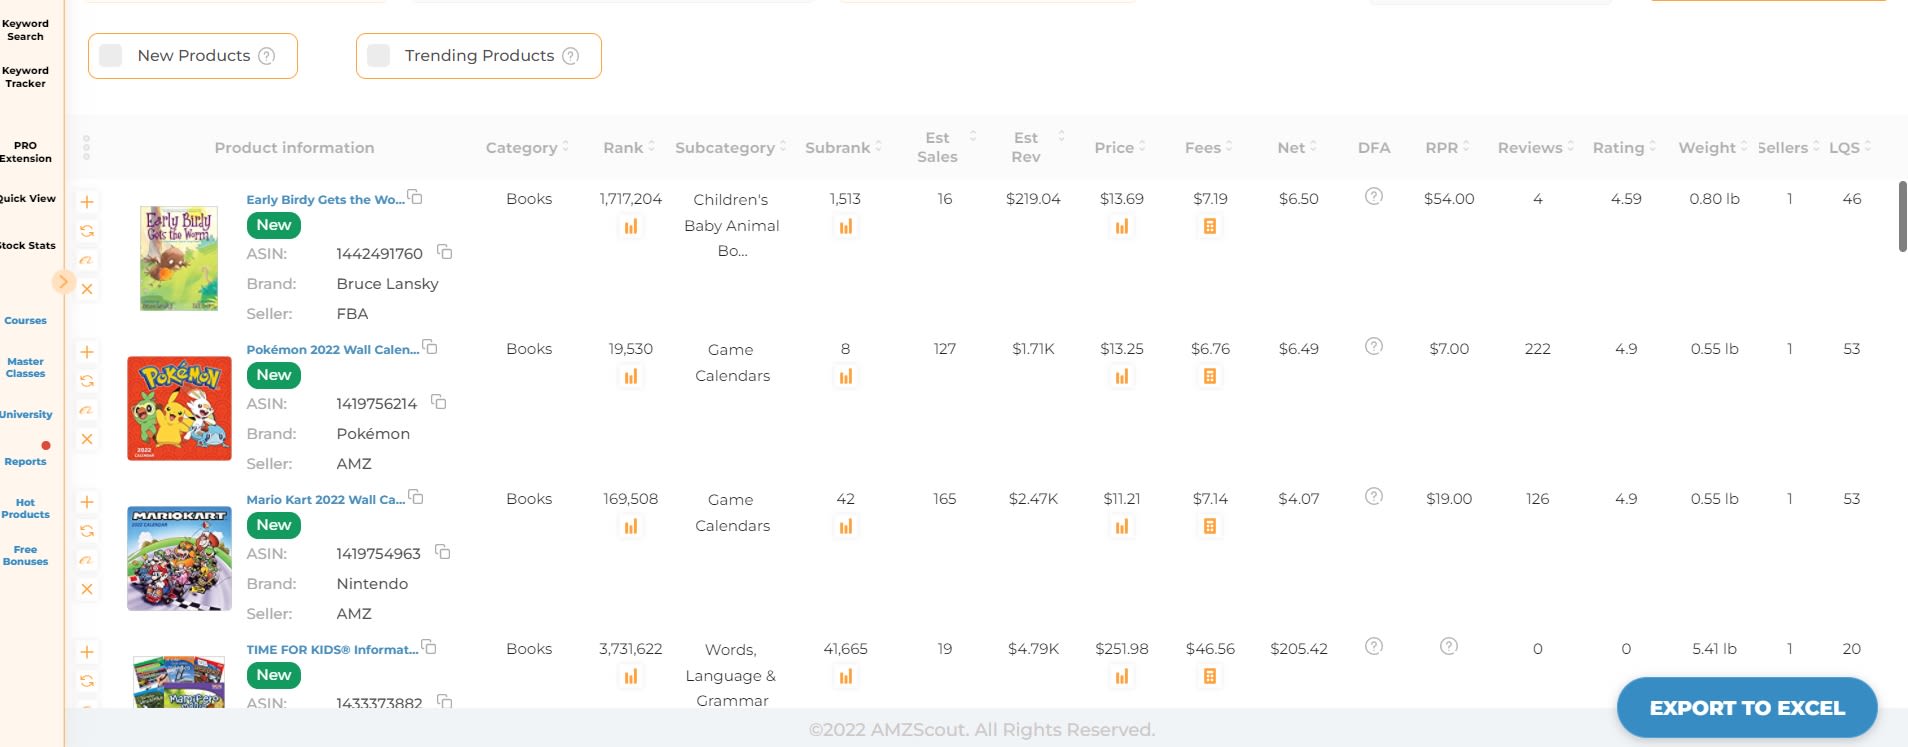
If you want to be successful you can’t just choose any product. You need to find one that has a good amount of demand amongst consumers while also not having a lot of competition. Luckily, there are a couple of products that can help you: the AMZScout PRO Extension and the Amazon Product Database. The Database makes it easy to weed out products that aren’t great to sell and allows you to focus on only the ones that meet your requirements.
1. Open the AMZScout Product Database.
2. Sign up for a free trial. If you are new to the platform, you will be taken to a sign-up form. Simply enter your details to begin your free trial.
3. Set search criteria. Use the search filters to select your product criteria. For instance, you can filter by sales, price, or weight. If you don’t know what filters to use, try one of the pre-made options from Product Selections.
4. Generate your results. Select Find Products.
5. Save any interesting ideas to analyze with the PRO Extension.
Once you find potential products in the Database, you’ll then need to check niche profitability and the level of competition in the PRO Extension.
1. Install the AMZScout PRO Chrome Extension.
2. Access the AMZScout PRO Extension
Amazon will automatically open after you install the extension.
Sign up for a free trial. If you have not yet registered, the extension will take you to sign-up form. Enter your details to begin the free trial.
Use the Amazon search bar to find a product or niche you saved from the AMZScout Product Database.
On the results page, click the AMZScout symbol in your browser’s extension bar to open the extension.
3. Check niche and product profitability. Review key metrics like net margin, estimated sales, and rating, for individual products or the niche as a whole.
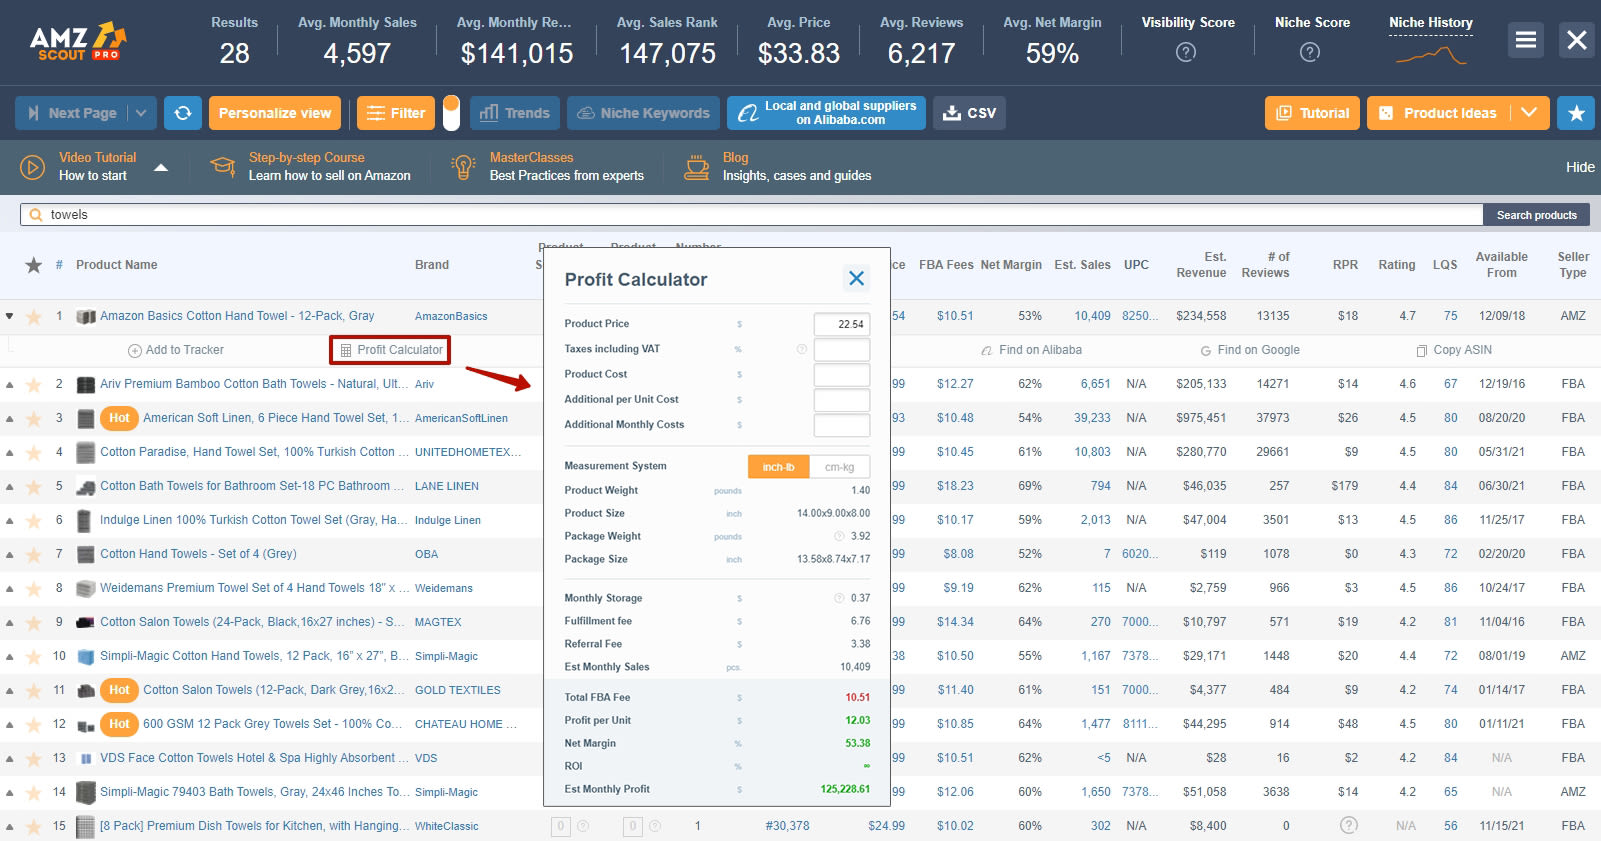
4. Determine estimated monthly profit.
Click the line for a potential product, to prompt a new line.
Select Profit Calculator.
Enter your data including sales price, product cost, etc.
Look at the estimated monthly profit.
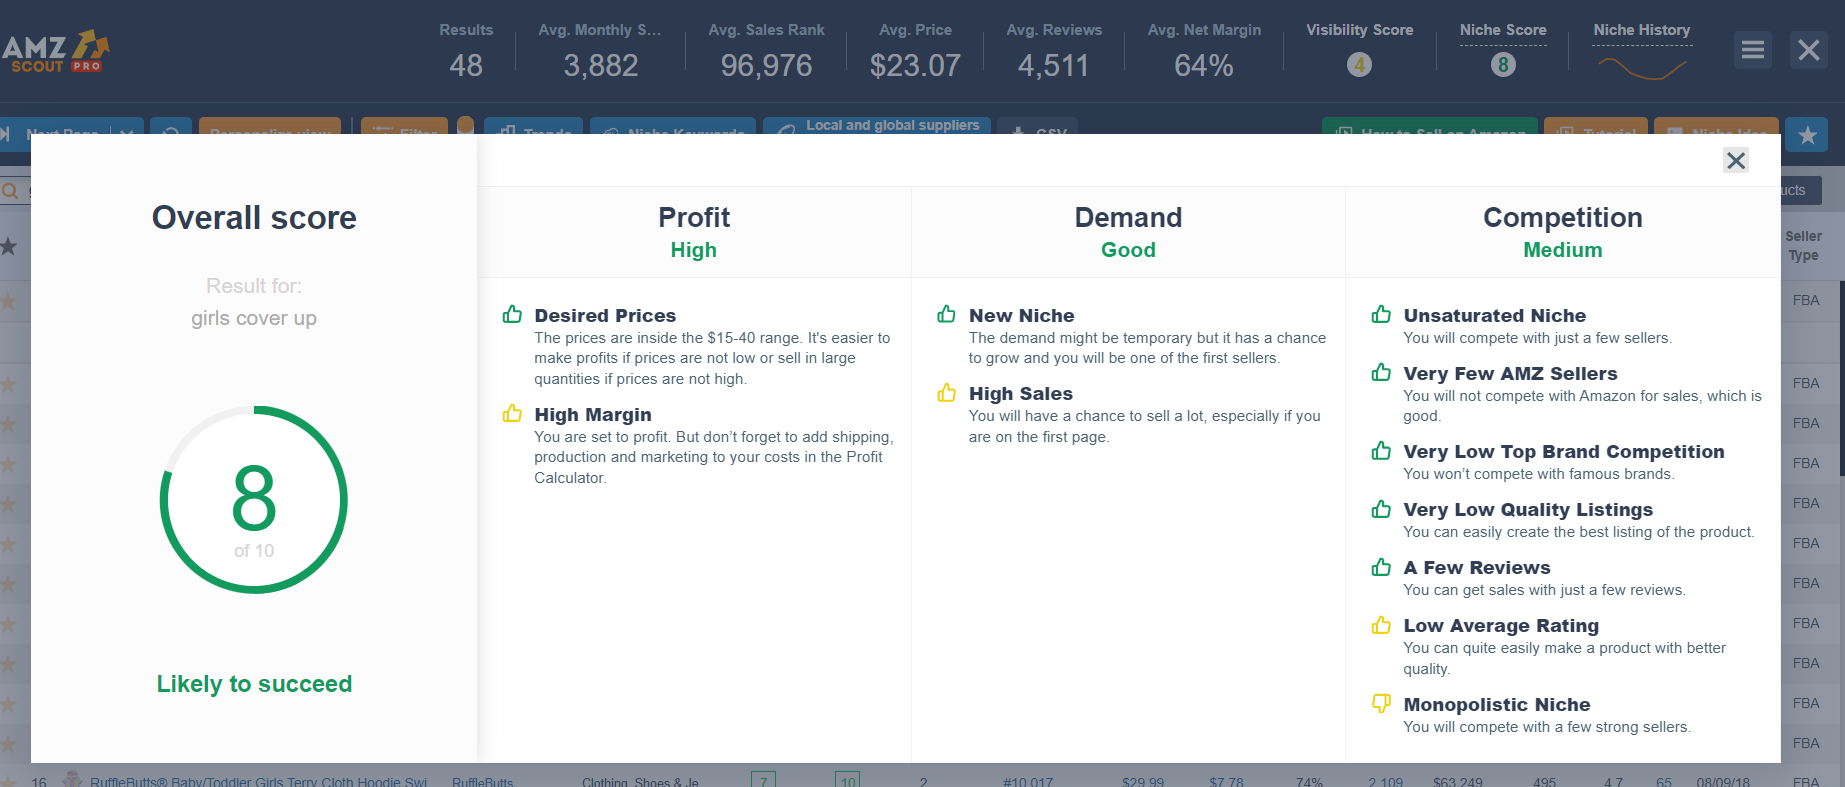
5. Review the niche demand. Click Niche Score for a breakdown of the niche’s overall demand.
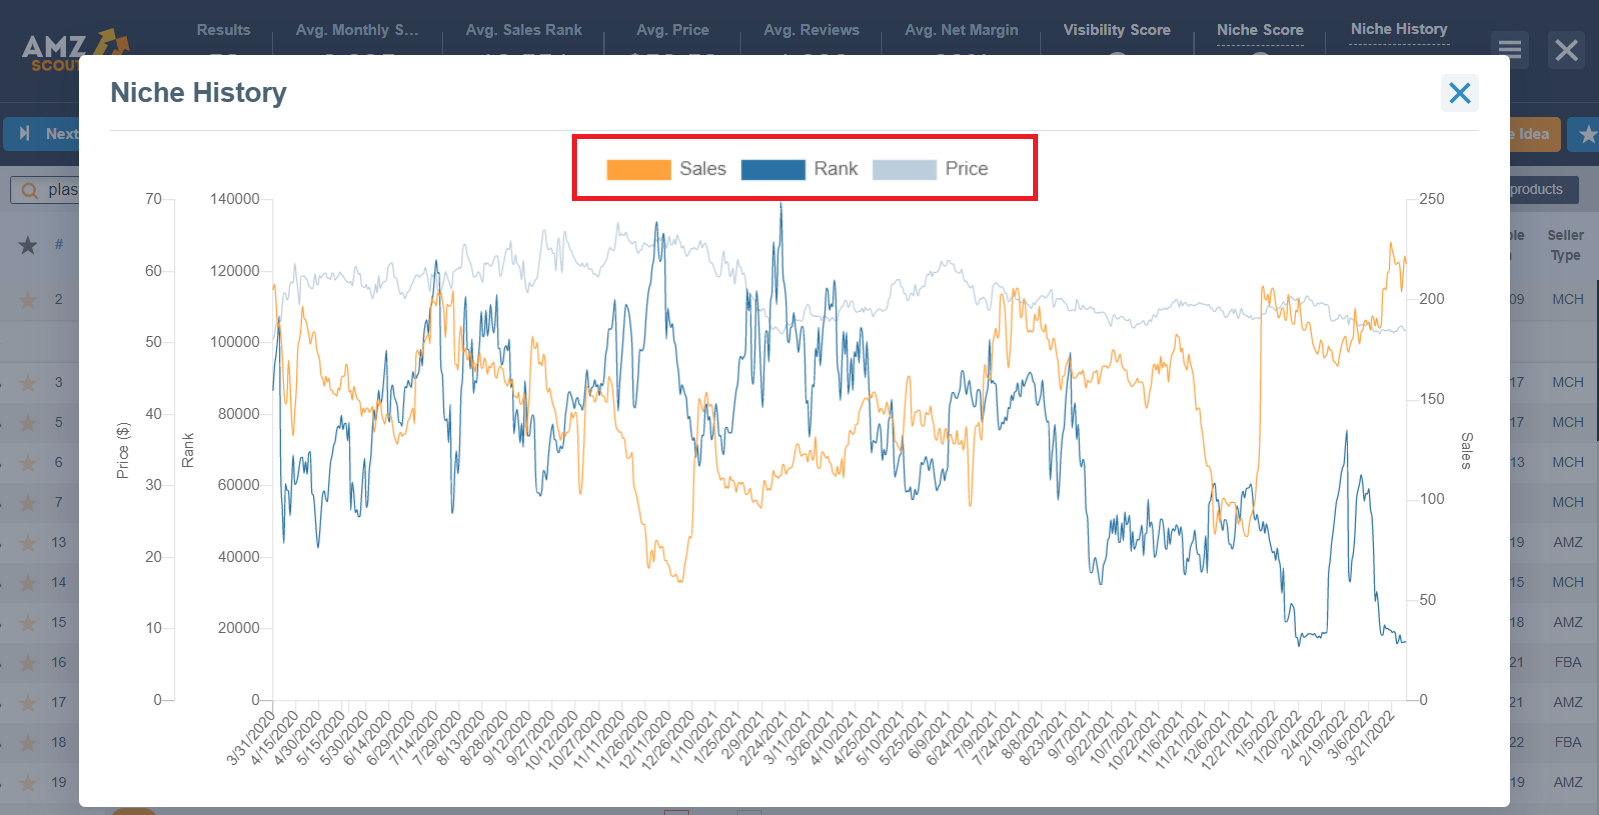
6. Check for consistent demand. Click the Niche History to make sure demand is steady and not seasonal.
Using these tools, you should easily be able to find several products that will be excellent choices to sell on Amazon.
Calculate Your Costs and Profits
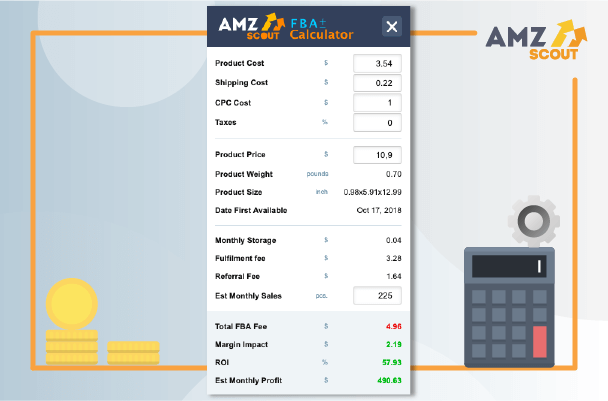
If you want to be certain you’ll make money with your products use the FBA Calculator to determine your sales margins. Simply find the product on Amazon, then open the calculator and enter the costs associated with the product.
The calculator will then determine how much money you’ll make on each sale. For the best results, try to find products that offer profit margins of 100%.
We receive a number of questions from new sellers about Amazon accounts, so we wanted to take a moment to address some of them here. See below for answers to the most common questions.
How Long Does it Take to Verify Your Amazon Seller Account?
In most cases, your account will be approved within 24 hours. However, if there’s a problem with any of your information, or you entered it incorrectly, this can delay the process. So, make sure to double-check everything you enter and only use valid information. Otherwise, you’ll have to wait longer before you can start selling.
What’s The Difference Between an Amazon Seller Account and a Business Account?
Amazon Business Seller Accounts are intended for business-to-business (B2B) sales. While businesses can still purchase your products if you only have a personal seller account, the business account offers a number of advantages, including:
Special business pricing and quantity discounts.
The ability to offer products only to business customers.
The ability to add enhanced content to your listings, including user manuals and safety information.
A business seller profile.
This is a great program for those interested in B2B sales. But if you’re only planning on selling products for consumers you don’t need to worry about it.
Can I Create an Amazon.сom Account if I Don’t Live in the US?
Yes. You don’t have to be a USA resident to register on Amazon.сom. You can create an account from the UK, Europe, India, or anywhere else around the world.
Can You Sell Your Amazon Seller Account, or Buy an Account from Someone Else?
No, Amazon accounts are not transferable. If you decide to sell your business at any point the new owner will need to create their own account.
Conclusion
Setting up your Amazon seller account is fairly easy. If you follow the instructions above you should be ready to sell within a day or two. Once your account is approved, use AMZScout’s advanced seller tools to find the right products for your business and start making money.

